
Here’s a free, quick and easy mini Christmas stocking knitting pattern you can knit flat with 2 straight needles.
Suitable for beginner knitters, you only need to know how to cast on and do knit and purl stitches to knit these cute xmas stocking decorations. You seam the sides together at the end to make a stocking shape.
If you would like to knit seamless stockings with no fiddly sewing up, check out the mini stockings knit in the round pattern instead.
You only need a small amount of yarn, so this is perfect for using up scraps of leftover wool or cotton. These mini stocking decorations are super quick to make, so ideal for some last minute Christmas knitting too.
Table of Contents
Materials & Notes
- A pair of 3.5mm / size 4 US knitting needles
- Small amount of DK or Sport weight yarn in 1-3 colours (see note below for using other yarn weights)
I used Rico Creative Cotton Aran (which knits as DK for me) in shades Red (5), Light Green (40) and creamy off-white Nature (60). - Optional: small amount of white teddy or snowflake yarn for a fluffy stocking cuff, ideally around dk weight but thicker will still work. For example: Rico Baby Teddy Aran (UK), Bernat Pipsqueak (US) or Sirdar Snowflake chunky.
- Tapestry needle for gathering the ends & weaving in ends.
If you want to knit hanging loops for your stockings, you will also need:
- Scraps of 4 ply/Sport/DK yarn. Heavier weight yarn will do but makes a chunkier loop.
- 3mm needles (or 3.5mm will do) for a cast on & off loop, or 2 short DPNs (any thickness up to 4mm) to knit an i-cord loop
Knit Mini Stockings with Any Yarn
Tension is not important here so you can use any weight yarn. I suggest using a needle a bit smaller than the standard size recommended so your stocking is nice & solid.
Finished mini stocking size with DK yarn: 4 inches (10cm) tall approx.
- For a slightly bigger stocking: try worsted or aran yarn with size 4-4.5mm knitting needles.
- For an extra mini delicate stocking: try 4 ply/fingering yarn with around size 3mm knitting needles.
Abbreviations
- R: row
- k2tog: knit 2 stitches together (decrease 1 stitch)
- kx: knit next x stitches
- px: purl next x stitches
Mini Stocking Colors
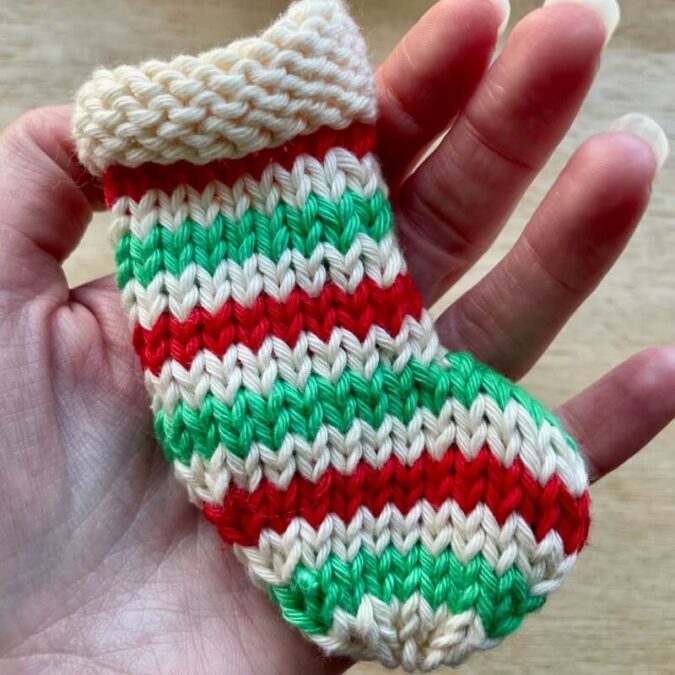
Knit a plain stocking all in 1 color, a plain stocking with a different color cuff, or a striped stocking – the choice is yours. To knit a striped stocking, just change color after knitting the cuff every 2 rows.
Tip: Knitting mini stockings in cotton gives a lovely soft & premium finish. I love Rico Creative Cotton Aran which knits as DK for me.
Here’s a couple of striped mini stockings below. I knit one in red & off-white stripes with a fluffy cuff. The other has a purl stitch cuff in the same cotton as the rest of the stocking, using off-white as the main color with alternating green & red stripes for a jolly festive look.
Mini Stocking Knitting Pattern for Straight Needles

Knit a mini Christmas Stocking flat using straight needles with this quick & easy pattern.
Total time approx: 1 hour and 15 minutes
Option 1: Fluffy novelty yarn cuff
Cast on 20-22 stitches depending on yarn thickness.
Knit 5 rows for cuff. Cut the fluffy yarn leaving a tail & knit the rest of the stocking with standard yarn.
Option 2: Standard yarn cuff
Cast on 22 stitches with cuff colour & knit the cuff in purl stitch (reverse stockinette).
Starting with a purl row, do 6 rows of stockinette (purl odd rows, knit even rows).
Step 2: Knit the stocking leg
Note: if knitting a striped stocking, change colour after every 2 rows.
i.e. Knit R1&2 in the top stripe colour, R3&4 in the next stripe colour etc until the last row. Knit the final row as the third row in final color.
R1: If you knit a fluffy cuff with 20 stitches, just knit 20. Otherwise, decrease by 2: (k2tog, k9) x 2 [20 stitches]
R2-12: Starting & ending with a purl row, do 11 rows of stockinette (purl even rows, knit the odd rows).
Step 3: Increases for stocking foot
R13: Cast on 5 stitches and knit 25 stitches
R14: Cast on 5 stitches and purl 30 stitches
R15: Knit
R16: Purl
Step 4: Decreases for bottom of foot
R17: k12, k2tog, k2, k2tog, k12 [28 stitches]
R18 & all even rows to R24: purl all stitches
R19: k11, k2tog, k2, k2tog, k11 [26 stitches
R21: (k1, k2tog, k7, k2tog, k1) x 2 [22 stitches]
R23: (k1, k2tog, k5, k2tog, k1) x 2 [18 stitches]
Step 5: Close bottom of stocking
R25: Don’t change colour and k2tog x 9 [9 stitches]
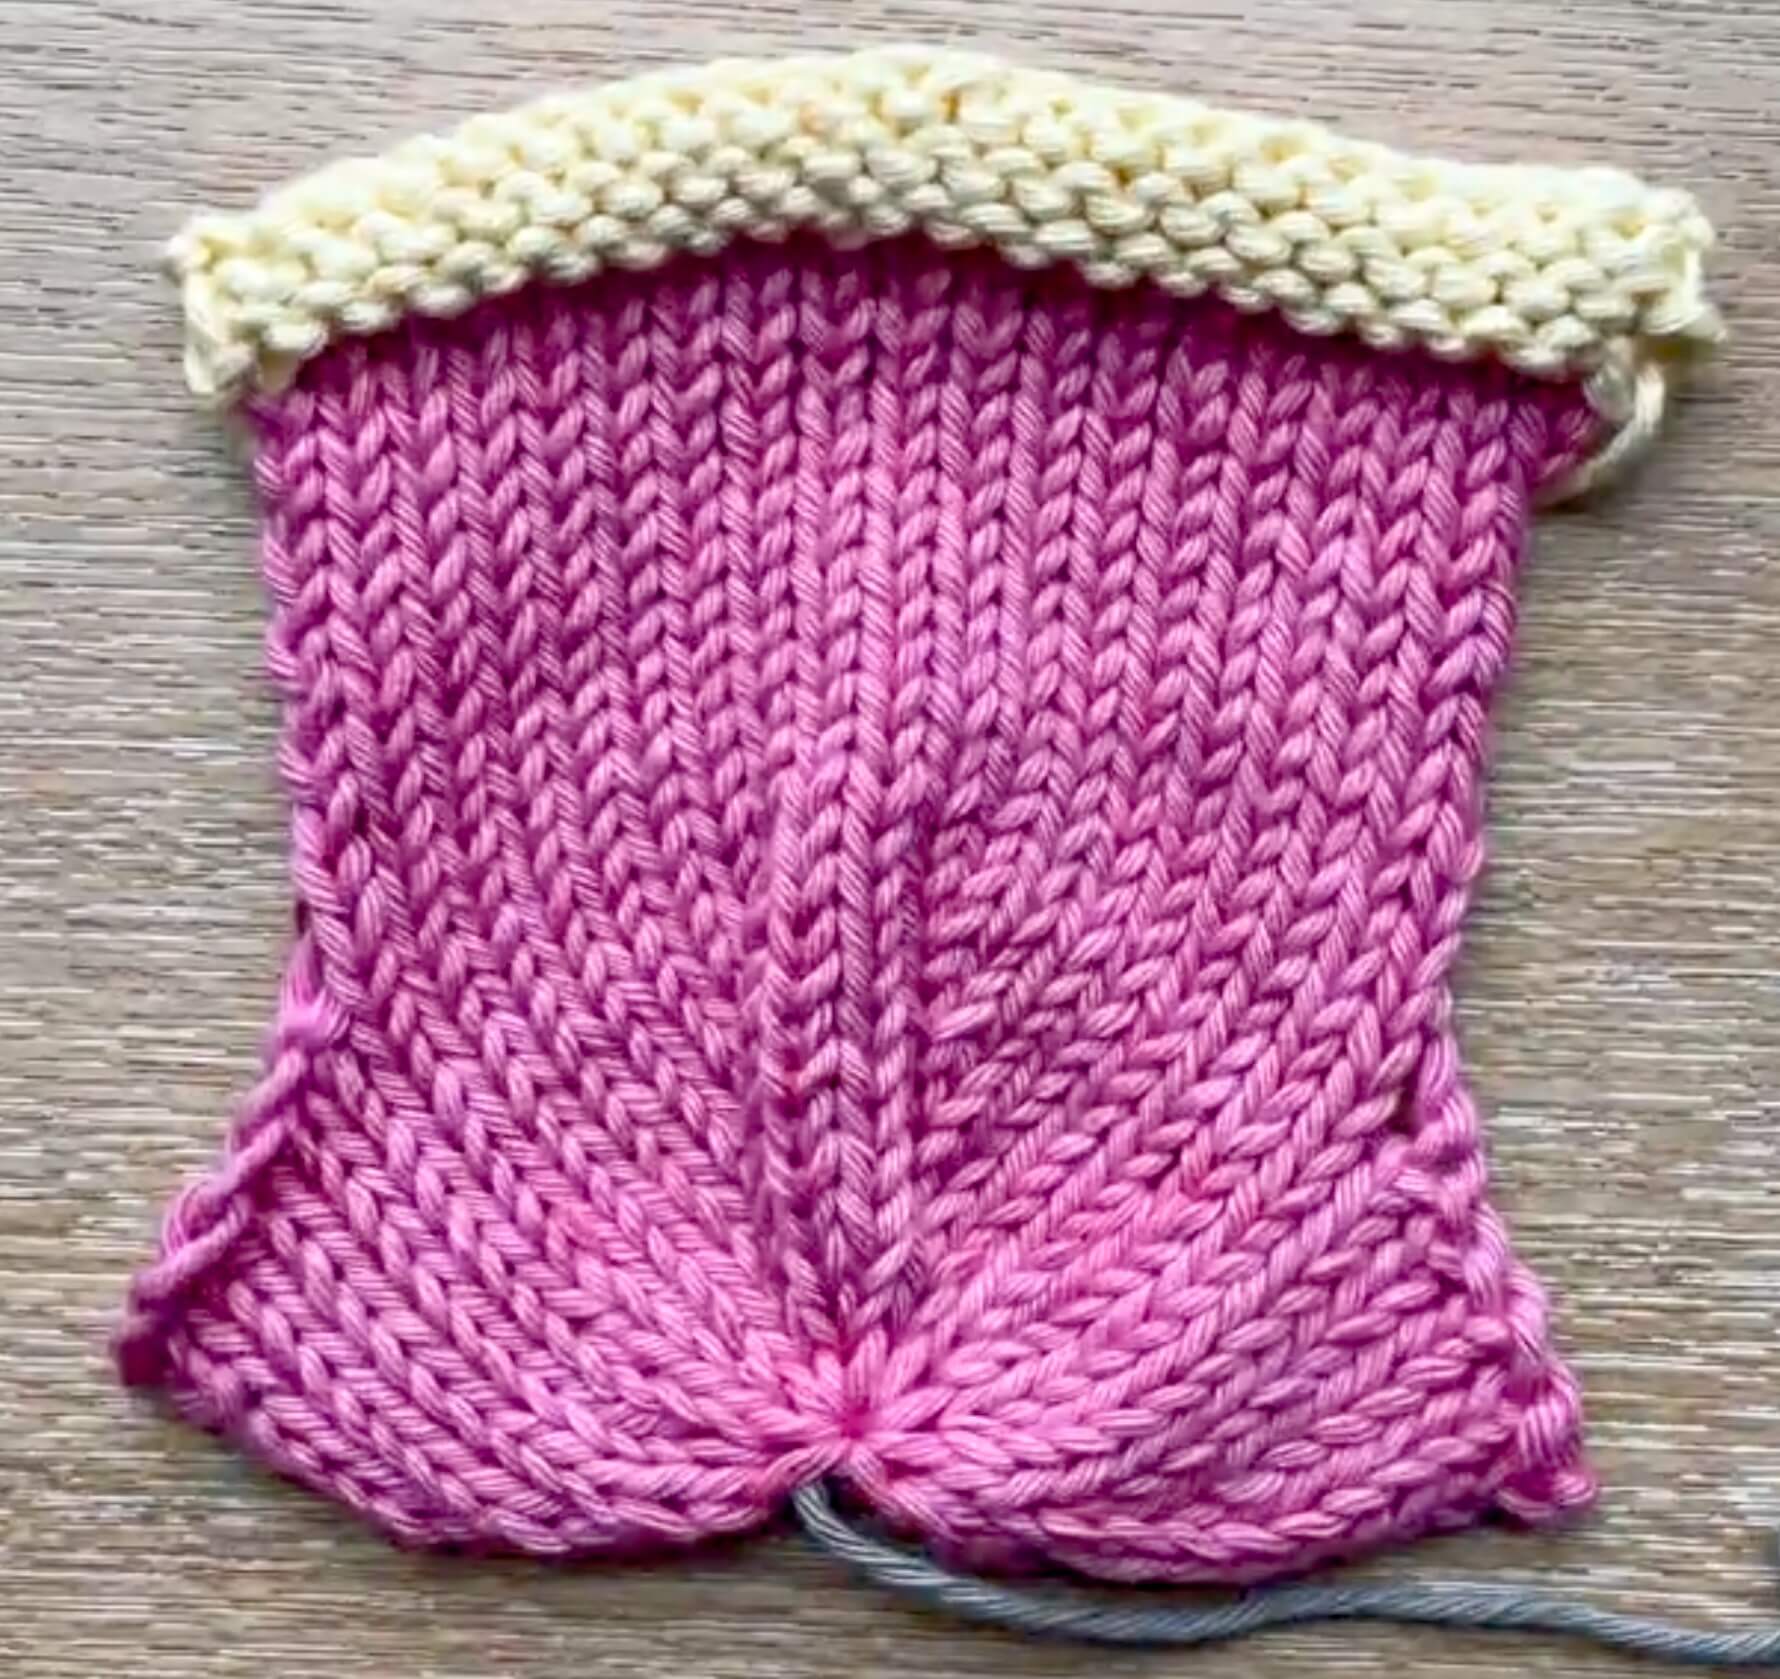
Leave a long length & cut yarn. Thread it through the 9 stitches & gather to close bottom of stocking & weave in ends. Or just hide them inside your little stocking.
The picture above shows how your finished knitted stocking piece looks (the yarn tail is just grey instead of pink because it’s from the seaming video below!).
Step 6: Seam side of stocking foot
Note: watch the video tutorial below for a full demo of how to seam your stocking (steps 6-8)
Fold your stocking in half to make an L shape. Mattress stitch the edges together from the bottom point up as far as row 14 where you cast on extra stitches.
To work mattress stitch, skip the first stitch column at each edge and stretch your knitting and look for the ladder of horizontal bars between your knitting stitch columns . Start on one side & put your needle through under the first bar. Repeat on the other side. Keep going and pull your seam tight after every few stitches and it should more or less disappear.
Step 7: Seam across top of stocking foot
Now work across the extra cast on stitches, putting your needle under a stitch on 1 side and then the other. Repeat to neatly join across the top. Shape slightly if needed into a nice round foot shape.
Step 8: Seam stocking leg
Continue up the the leg & cuff of your stocking, using mattress stitch to join the edged together for a neat finish. Weave in all ends, or just leave them loose and hide them inside your stocking if you’re lazy 🙂
Video Tutorial: How to Seam your Knitted Stocking
Watch the video below for a full step by step demo on seaming your knitted stocking. It’s a great way to try out mattress stitch, which is almost invisible and gives a really neat finish. Bonus: you can use it for ALL your knitting projects!

Knit a Hanging Loop for your mini stocking
If you would like to hang your stockings on a Christmas tree or garland, here are 2 ways to knit a hanging loop. Alternatively, you could sew on some pretty ribbon or twine string.
Option 1: Cast on & off loop
This is the quick way, but it makes a slightly chunkier loop, so fingering, 4ply or sport weight yarn works best.
- Cast on 30 stitches or double the length of hanging loop you want.
- Cast off all the stitches without knitting any rows and leave a long tail.
Cast off in the usual way, by knitting the 1st 2 stitches and passing the 1st stitch over the 2nd etc.
Option 2: I-cord loop
If you have a couple of short double pointed needles (DPNs), knitting a length of 2 stitch i-cord makes a lovely neat hanging loop that is not too chunky.
Using the same yarn as the stocking or any sport/DK scraps, cast on 2 stitches and knit 5 inches of i-cord, or double your desired loop length, before casting off.
See my how to knit i-cord tutorial (including video demo) for a full step by step guide for knitting i-cord hanging loops for decorations.
Tip: You don’t have to use 3mm DPNs, any thickness up to 4mm approx works well.

Attach your Hanging Loop
Thread one of the tails of your hanging loop with a tapestry needle and stitch it to the inside of the top left of the stocking (with the foot pointing to the right).
Attach the other tail of the loop with a few stitches around the same spot. Weave in the ends on the inside of the stocking or just knot them and hide them inside it.

I hope you enjoy knitting some mini Christmas stockings. Please leave a comment below if you have any questions on the pattern.
This free pattern is for personal, non-commercial use only. It may not be copied, sold, translated or distributed in any way, nor any finished items made using it sold, without permission.


")

