
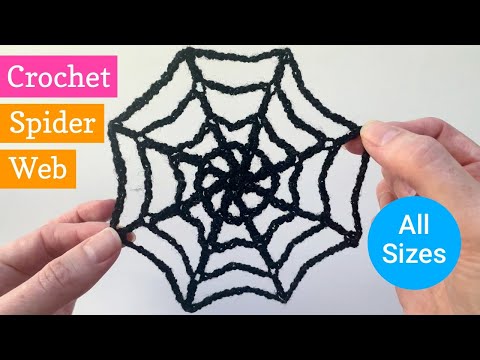
Make a spider web decoration for Halloween with this easy crochet pattern. It is really quick to crochet – it’s mainly just making chains. You can also easily extend the pattern to crochet a spider web of any size.
This pattern is part of my Halloween garland crochet motifs collection. You can also crochet a pumpkin face, flying bats, make some friendly or scary ghosts or embroider a crochet cat face. If you don’t want to make bunting, this crochet spiderweb pattern makes a cute hanging decoration for Halloween all by itself.
Table of Contents
Crochet Spider Web Video Tutorial
Here’s a full step by step video tutorial for this crochet pattern. Watch below or scroll on for the written pattern with pictures.
This 10 minute video has timestamps throughout so you can skip straight to the parts you need help with.
Materials & Notes
- Sport or DK weight yarn. The glittery yarn I used is now discontinued unfortunately (Lion Brand Vanna’s Glamour) but Yarnart Manhattan or James C Brett Twinkle DK are similar sparkly metallic yarns.
- 3.5mm crochet hook – I love Addi swing hooks
- Fabric stiffener. I used Beacon Stiffen Stuff
- Lots of pins
- Blocking mat or something to pin the web out on. I have Boye foam blocking pieces.
- A bit of plastic to cover your blocking mat to stop your crochet web sticking to it.
Finished size: 5 inches (12cm) diameter approx. You can make a larger spider web by adding more rounds to the pattern below.
Gauge is not important here. While you can use any weight yarn, thinner yarns give a better spider web effect. Make sure you change the hook size to suit your yarn. You can use a hook size around that suggested on the ball band, or increase your hook size for a looser, lacier web.
Abbreviations
NB this pattern uses US crochet terms. The equivalent UK crochet stitches are listed after each term.
- R – round
- st – stitch(es)
- ch – chain
- sl st – slip stitch
- sc – single crochet stitch (UK: double crochet)
- dc – double crochet stitch (UK: treble crochet)
Crochet Spider Web Pattern
How to crochet a spider web of any size
Round 1
Starting with a magic ring do 4 sc and join with sl st. [4 st]
OR you can start with a chain ring (3 min video demo) instead if you like.
Round 2
Ch 5 (counts as 1 dc & 2 ch). Do 1 dc in 1st sc & ch 2.
(1 dc in next sc, ch 2, 1 dc in same sc, ch 2) x 3 times. Sl st in 3rd ch of initial 5 ch to complete round.
[8 dc separated by 2 ch]
Round 3
Ch 7 (counts as 1 dc & 4 ch).
(1 dc in next dc, 4 ch) x 7 times. Sl st in 3rd chain of initial 7 ch to end round.
[8 dc separated by 4 ch]
Round 4
Ch 9 (counts as 1 dc & 6 ch).
(1 dc in next dc, 6 ch) x 7 times. Sl st in 3rd chain of initial 9 ch to end round.
[8 dc separated by 6 ch]
Round 5
Ch 11 (counts as 1 dc & 8 ch).
(1 dc in next dc, 8 ch) x 7 times. Sl st in 3rd chain of starting 11 ch to end round.
[8 dc separated by 8 ch]
Bind off unless you want to crochet a larger custom sized spider web (see next step). Weave in ends.
Optional – make a larger web by adding more rounds
Just follow the same format as round 2-5 above. Add 2 to the starting chains and also increase the chains between each dc by 2. For example, the next round would start with 13 ch (11 + 2) and each dc would be separated by 10 ch (8 + 2).
Apply stiffener
Your crochet looks more like a lacy flower than a spider web at this stage. Stiffener will fix that. I used Beacon Stiffen Stuff. Alternatively you could try starch, mixing white PVA glue with water or even strong hairspray. Spray or coat your crochet well with the stiffener.
Watch the pattern tutorial video from the 8 min timestamp to see exactly how to stiffen your web (2 mins).
Pin out spider web edges
Place some plastic, e.g. a small bin bag, over your blocking mat to protect your mat (and stop the crochet sticking to it if using Stiffen Stuff). Lay your wet crochet piece down on this & pin in the centre.
Pin 2 opposite points to the mat. They should be fairly taut & approx 12-13cm apart if using sport yarn. Repeat for the other 3 sets of opposite points. Tweak if needed until you have a fairly even round shape.
Add spider web curves (optional)
If you want to curve your chains for a more authentic spider web look, add lots more pins. For the outer 2 rings, add 2 pins on top of each chain length, pulling it down to curve gently inwards. Just add 1 pin mid way along each smaller chain on the 3rd inner ring.
Leave to dry
Stiffen Stuff instructions say it takes an hour to dry, but I found it took longer. Whichever stiffener method you choose, the longer you leave it the better. Overnight is a good rule of thumb if you are unsure of your stiffener strength.
Add a loop for hanging (optional)
If you would like to use your spider web as a hanging decoration, put your hook through one of the 8 end points, pull a loop of yarn through & chain for double your desired loop length & slip stitch back into the same end point. Bind off & weave in ends.
I hope you enjoy crocheting your spider webs. If you have any questions just comment below and I will try to help.
Be sure to check out my other free crochet Halloween decoration patterns.
This free pattern is for personal, non-commercial use only. It may not be copied, sold, translated or distributed in any way without permission.


I’ve just done a (white) spiderweb. It’s drying with an awful lot of pins (that made it feel like it was a voodoo doll instead of a spiderweb!) I’ll take it to my classroom too.
It’s cool you’re putting spider webs up in school. Yes the pinning is a bit intense! LOL