Knitting in the round can seem strange & even scary, but it’s surprisingly simple. Here’s how to get started, step by step.
Table of Contents
Knitting in the Round Video Tutorial
See how easy it is to get started knitting in the round in this step by step video tutorial for beginners. It covers what you need, casting on, joining to knit in the round and knitting rib in the round. Or scroll down for a more detailed written guide with photos below.

The easiest way to knit in the round
The easiest way to knit in the round is with a circular needle that’s shorter than the circumference of what you’re knitting.
- use a short 16 inch (40 cm) circular needle to knit a hat or sleeve
- use a longer 32 inch (80 cm) circular needle for the body of a sweater
There are several other ways to knit in the round. You can use a set of straight double pointed needles (DPNs), 2 circular needles or the magic loop method (using 1 extra long circular).
But these techniques are all more complicated & fiddly to do. So it’s best to learn knitting in the round with a circular needle first. It’s much easier to learn other ways of knitting in the round once you know the basics.
There is no “best” way to knit in the round. Each has their place & it’s often down to personal preference.
Help: I’ve never used circular needles!
If you’ve only ever knit with straight needles, circulars can seem like an alien universe you know nothing about. They did to me!
But I couldn’t have been more wrong. Circular & straight knitting needles actually have a lot in common. I now use circular needles instead of straights for knitting back & forth in rows.
I first learned to knit in the round with double pointed needles (DPNs). I had knit with straight needles all my life, so using straight needles to knit in the round seemed logical & simpler than trying to get my head around scary circular needles.
But it’s actually much easier to learn knitting in the round with a circular needle than DPNs.
New to circular needles? See my how to knit flat with circular needles guide first. Once you see how alike straights & circulars are, moving on to knitting in the round is easy.
What you need to get started knitting in the round
I recommend beginners learn to knit in the round with:
- a ball of worsted, aran or chunky yarn
- a short 16 inch (40 cm) circular needle with 5mm tips or larger (use the needle size on your yarn ball band). I use KnitPro / Knitter’s Pride wood needles.
This is ideal for beginners as the needle tips are a decent size and there are not too many stitches. Plus, you can use these supplies to knit a quick & easy hat like my free easy knit beanie pattern which makes a perfect first knitting in the round project.
Step 1: How to Cast On when Knitting in the Round

First, cast on your stitches using the long tail cast on (video tutorial here). This works well for knitting in the round & is easiest for beginners, but you can use any cast on for circular knitting.
Holding one circular needle tip in your right hand, do the long tail cast the same way as with a straight needle. Just move the stitches down along the cable cord as your tip fills up.
Fill your circular needle with plenty of stitches. If your stitches are stretching to reach the tips, add some more. You want your needle full of stitches.
As a rough guide, cast on about 80 stitches with worsted or aran yarn, or 70 stitches approx. with chunky yarn. Or follow my easy knit beanie pattern for circular needles or any basic knit in the round hat pattern if you prefer.

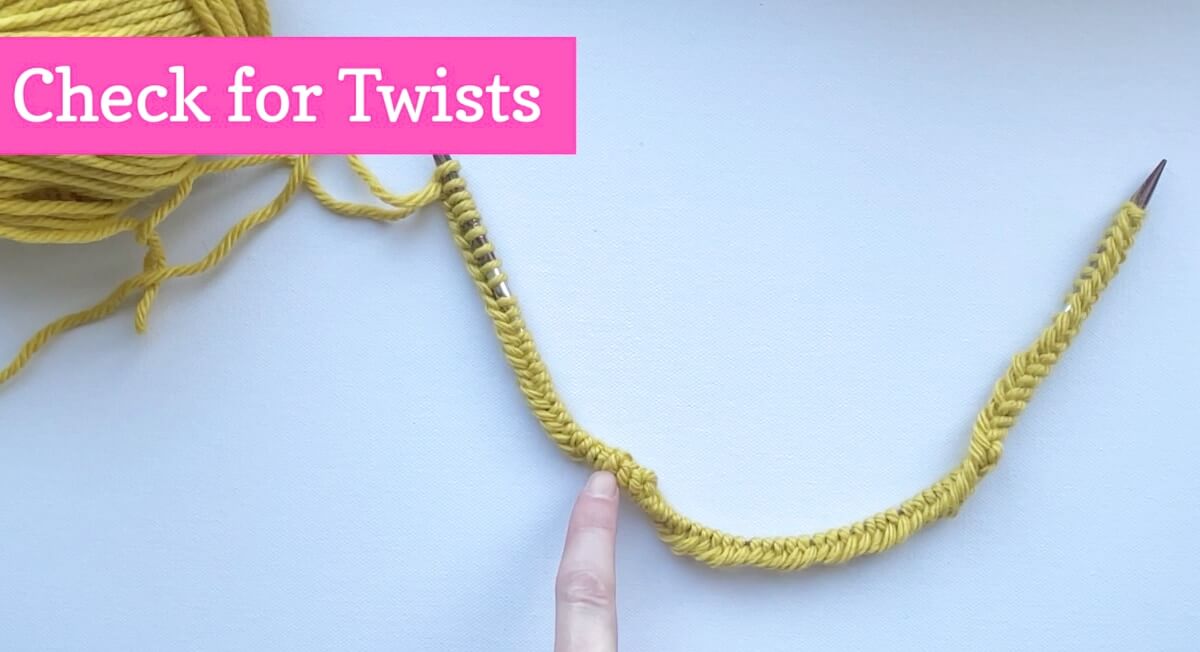
Step 2: Check your Cast On is not Twisted
It’s vital to check your cast on is laying flat without any twists before you join to knit in the round.
Otherwise, instead of knitting a nice tube shape, you’ll have a twist in it you can’t get rid of and will need to start all over again. Aagghh!
All stitches should be facing the same way, with your cast on edge making one clear line from end to end under your stitches.
The long tail cast on doesn’t tend to twist round easily which helps. But with a lot of stitches, you might have a few kinks.
So run your hand along the needle, turning bits if needed, so that your cast on lays flat.
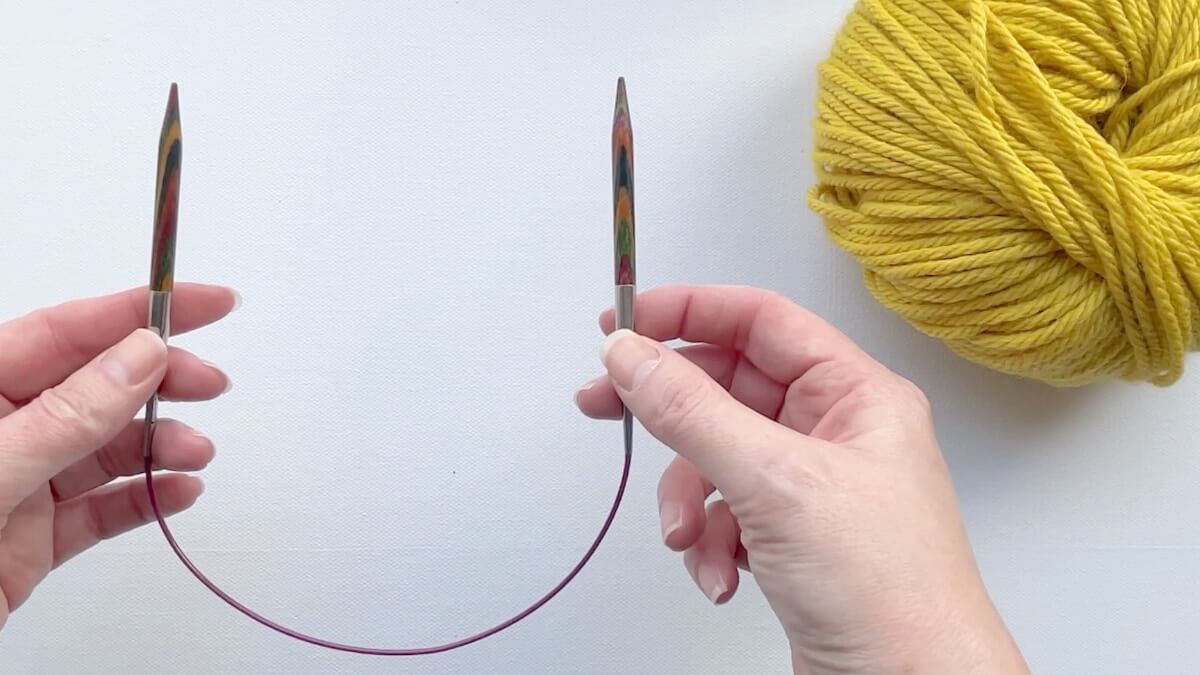
Step 3: How to hold your Needle Knitting in the Round
Lay your needle down with the stitches close to both tips and the bumpy or wrong side of the cast on facing you.
The yarn tail and ball are on the right side and the working yarn is facing upwards.
Pick up the right needle tip with your right hand, and the other tip with your left. Point the tips at each other, so that your needle makes a circle shape behind.
Let your yarn tail hang down at the front and check that the working yarn is behind.

Step 4: How to Join Knitting in the Round
It’s finally time to join in the round. While this is the key step, it’s actually the easy bit after all the prep work.
All you need to do is knit the first stitch on the left tip, moving it across to the right tip beside the last stitch. It’s that simple.
So with your stitches close to both tips, and holding your yarn behind as usual, put your right tip into the first stitch on your left tip and knit it as usual.

Gently pull both your yarn tail and your working yarn to snug up the first stitch and minimise the gap.
Now just knit your 2nd stitch as usual and then a few more stitches. That’s the joining done and you now have a circle of stitches instead of a line. You’re now knitting in the round. Yay!
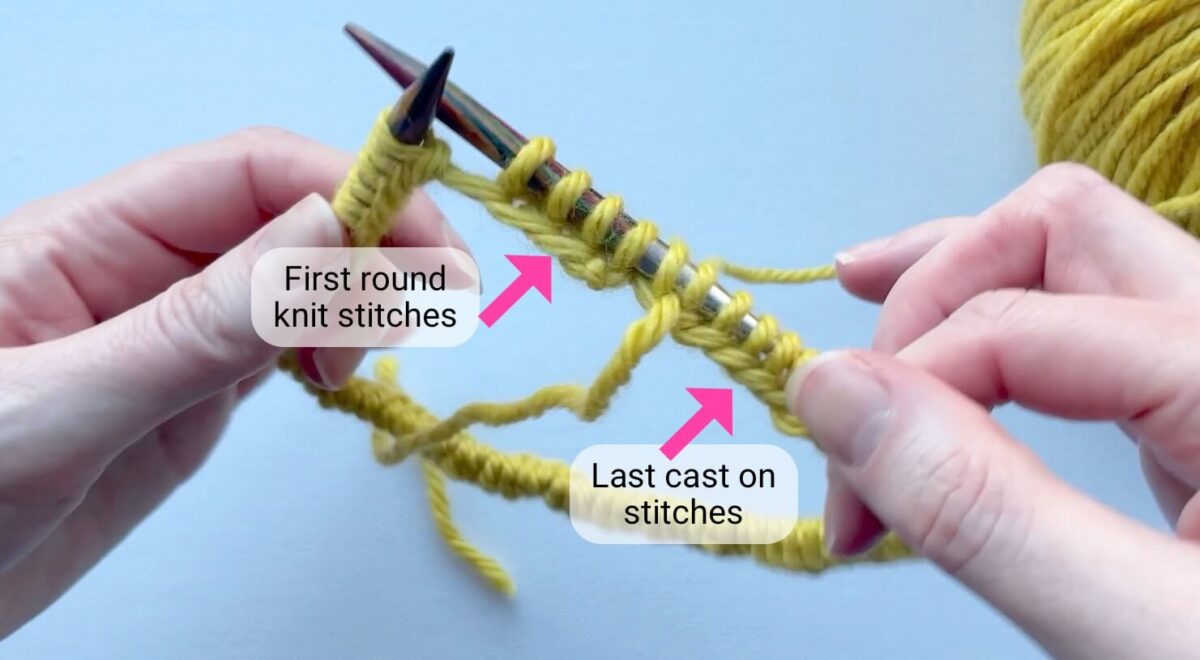
Step 5: Ending Round 1 & Starting Round 2
Keep knitting every stitch as usual until you come back to your yarn tail which marks the end of your first round.
You’ll have a small gap between your first and last stitch. Don’t stress about this. Pulling your yarn tail can tighten it up a bit but it will magically neaten up after a few rounds.
You can place a stitch marker here to make the end of the round easy to see. Or you can just use your yarn tail instead, by passing it through between your needles after each round.

To start your 2nd round, just keep knitting.
Help: My Knitting in the Round looks Messy
After a few stitches you’ll notice the bottom edges don’t line up. That’s because the start of the round has an extra row of stitches than the end.
Don’t worry about this. It looks a bit messy at first, but the more you knit the better it looks. You can barely see it on this work in progress pink hat below.


It’s also normal for your circle to look a bit bumpy and twisted for the first few rounds.
It’s worth having a quick check round just to make sure there are no actual twists, but that’s unlikely if you used a long tail cast on and checked before you joined. Again, this will all sort itself out once you knit more rounds.

Knit Stockinette without Purling
You always work on the right side when knitting in the round.
This makes knitting stockinette in the round easy peasy. You just knit every stitch without purling at all. How cool is that?
Many modern top down sweater knitting patterns that are knit in the round are mostly stockinette. Once you get past the yoke, that’s lots of mindless knitting round and round. Relaxing, rhythmic knitting bliss!
When you’re knitting back and forth in rows, turning your work each time, knitting every row gives you garter stitch. If you want to knit garter stitch in the round, you need to knit the odd rounds and purl the even rounds instead.
It’s a bit to get your head around at first, if turning your work and having a right and wrong side to your knitting is second nature to you. But only working on the right side means you always see how your knitting really looks which is much more intuitive.
Plus knitting stockinette is much quicker in the round without pesky purl stitches slowing you down.
How to Knit Ribbing in the Round
You’ll often start knitting in the round patterns with rib stitch rather than stockinette.
Most hats are knit from the bottom up, with ribbing first for a good fit. I’ve a free beginner beanie hat pattern that makes a great first knitting project with circular needles. You can make a practical everyday hat while you learn – nice!
The good news is that you join in the round the same way for all stitch types. Here’s step by step instructions for joining in the round with knit 1 purl 1 rib, as that’s the most common.

How to knit K1P1 rib stitch in the round
Cast on an even number of stitches
I recommend using the long tail cast on as this works well for knitting in the round & is nice and stretchy for ribbing. Cast on at least enough stitches to fill your circular needle from end to end.
Check your cast on stitches are laying flat without any twists.
Knit the first stitch to join in the round
Hold your circular needle with the working yarn behind the tip in your right hand, pointing at the other tip in your left hand.
Knit into the first stitch on the left tip with the right tip, just like in the stockinette step by step guide above (step 4).
Purl the second stitch
For 1×1 ribbing, the 2nd stitch is a purl stitch instead of a knit stitch. So bring the yarn forward and go into the next stitch on the left tip from right to left and do a purl stitch in the usual way.
Keep alternating between knit and purl stitches
Take your yarn to the back again and knit into the 3rd stitch. Then bring your yarn to the front again and purl the 4th stitch.
Continue in this basic rib stitch pattern, knitting 1 stitch and purling the next, until you get back to your yarn tail that marks the end of round 1.
Finish round 1 of rib stitch
The last stitch in the round is a purl stitch. You can pull the yarn tail to neaten it up. Place a marker to help see the end of the round or just use your yarn tail as a guide.
Round 2 onwards
Every round repeats the same 1×1 rib pattern set in round 1. So with your yarn at the back, you knit the first stitch in round 2. Then you bring your yarn forward and purl the next stitch, just like in round 1.
From round 2 on, you just keep knitting every knit stitch and purling the purl stitches.
Repeat until ribbing is the desired length and you are back at the end of round marker. To switch to stockinette, just knit every stitch in each round onwards.
I hope this beginners guide encourages you to give knitting in the round a go. Why not try my free beginner hat knitting patterns for circular needles as your first knit in the round project?
Got any questions about circular knitting? Just comment below & I’ll try my best to help.
")
")
")

Thank you for your videos. I love how you show how to knit flat on round needles. It’s so easy to understand.
Thanks for the kind words Eva. So glad you found the video easy to follow.
thank you for this easy to follow video!
You’re most welcome Patty 🙂 Delighted you found it easy to follow thanks